When I first started trading, I made the same mistake almost every beginner does — I relied on too many indicators. My TradingView chart looked like a Christmas tree, glowing with RSI, MACD, VWAP, Bollinger Bands, and God knows what else. Every candle seemed to blink with signals — buy here, sell there, wait now — yet none of it gave me conviction.
After a few painful months of chasing signals and losing consistency, I realized something powerful: clarity beats complexity. And that’s when I discovered a clean, two-indicator system built around one of the most trusted tools in trading — the Exponential Moving Average (EMA).
In this article, I’ll share the exact EMA trading setup that changed how I trade — a rule-based, beginner-friendly strategy that works across multiple markets like stocks, forex, and crypto. It filters noise, gives clear entries, and helps you stay emotionally grounded.
💡 What Is EMA and Why Traders Love It
The Exponential Moving Average (EMA) is a technical indicator that smooths out price data while giving more weight to recent prices. Unlike the simple moving average (SMA), EMA reacts faster to price changes — which makes it perfect for scalping and intraday trading.
EMA helps you:
- Identify the direction of the trend
- Spot potential reversal points
- Act as a dynamic support or resistance level
- Filter out random price spikes
Most professional traders rely on EMAs because they visually show what the market is doing — trending, consolidating, or reversing. When combined with a momentum indicator, it becomes a complete system that balances direction with confirmation.
⚙️ Rule-Based Setup: The EMA + Momentum Strategy
If you’ve ever tried scalping on a 5-minute TradingView chart, you know how wild things can get — false breakouts, random spikes, and sudden reversals that test your patience.
The EMA-based setup I use simplifies everything. It uses just two indicators:
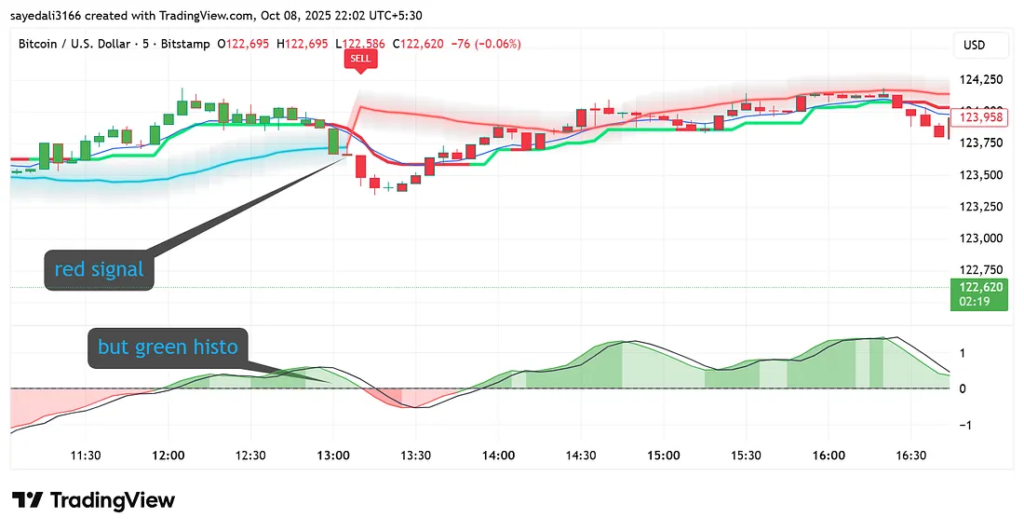
- Trend Magic EMA Indicator — It paints the trend direction clearly.
- When it turns blue or green, focus on buy setups.
- When it turns red, shift your focus to sell setups.
- Magical Momentum Indicator — Placed below the chart like an oscillator, it shows whether momentum supports your direction.
- Green bars mean bullish strength.
- Red bars mean bearish strength.
When both indicators align, you get a high-probability trade setup.
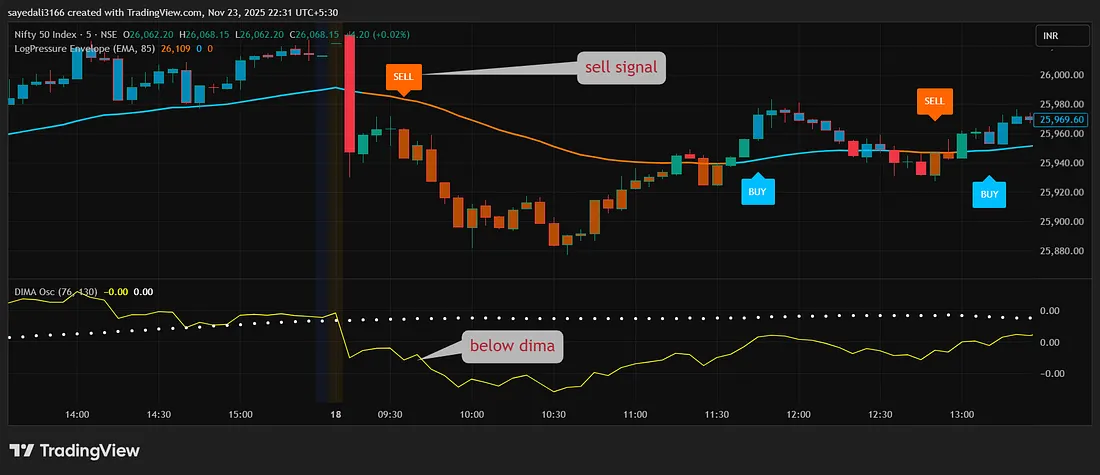
🔻 The Sell Setup: Catching Momentum Downtrends
Let’s start with the short side of the market. Imagine you’re on a 5-minute chart of NASDAQ, NIFTY, or BTC/USDT.
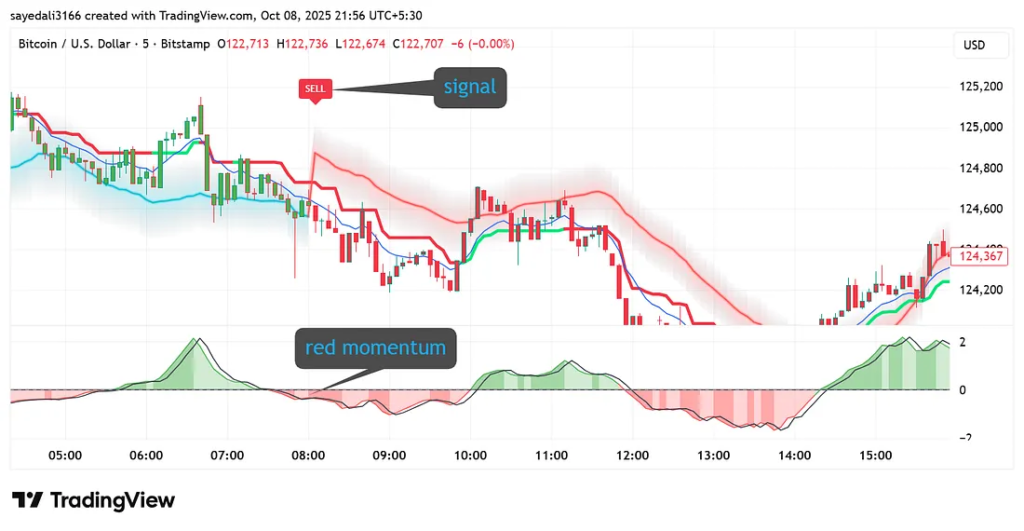
Here’s the sell logic step-by-step:
- Trend Confirmation: The Trend Magic EMA changes to red, signaling bearish bias.
- Candle Structure: The recent candles start forming lower highs and lower lows.
- Momentum Confirmation: The Magical Momentum indicator below turns red, confirming that sellers are in control.
🎯 Entry Rule:
Once both indicators confirm bearishness — enter a sell trade on the next candle.
🛑 Stop Loss (SL):
Set your SL just above the EMA line (or the last swing high).
💰 Target:
Use a 1:1.5 risk-reward ratio. For example, if your stop loss is 10 points, aim for 15 points of profit.
💬 Pro Tip:
Wait for the candle to close before confirming the signal. Many traders jump in too early and get trapped in a false breakout.
When this setup aligns, you’ll see price gliding smoothly downward — often hitting your target faster than you expect.
🔺 The Buy Setup: Riding Bullish Momentum
Now, let’s flip the direction.
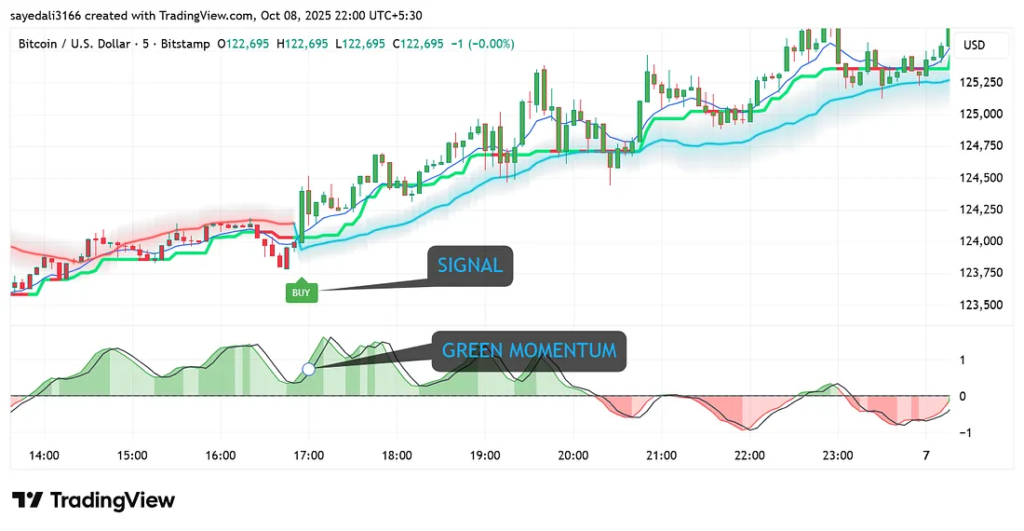
- Trend Confirmation: The Trend Magic EMA changes to green or blue.
- Price Action: Candles begin to form higher highs and higher lows — a clear sign of strength.
- Momentum Confirmation: The Magical Momentum indicator turns green, validating that buyers are in control.
🎯 Entry Rule:
Go long as soon as both indicators agree — EMA trend is bullish and momentum is green.
🛑 Stop Loss:
Place SL just below the EMA line (or recent swing low).
💰 Target:
Aim for 1.5x your risk. That keeps your win/loss ratio sustainable even with 50% accuracy.
This combination works incredibly well on volatile assets like NASDAQ futures, NIFTY50, Gold (XAU/USD), and major crypto pairs like BTC and ETH.
⚠️ The Truth About False Signals
No matter how good a setup looks, no strategy wins 100% of the time.
Sometimes the Trend Magic EMA turns red, you sell — and the candle immediately reverses. Or the momentum flips mid-trade.
Here’s what you need to remember:
- Losses are part of the system.
- The goal isn’t to avoid losses, but to manage them.
- With consistent rules, your winners will outgrow your losers.
The beauty of this EMA setup is that it’s transparent. When a trade fails, you know why — either the indicators disagreed or the market reversed. There’s no confusion, and no “maybe I should have waited” frustration.
🧠 Psychology: Why Simple Setups Work Better
Most new traders lose not because of bad strategies, but because of information overload. The more indicators you stack, the more you second-guess yourself.
The EMA + Momentum setup works because it trains your discipline. It gives you:
- A visual confirmation system (trend + momentum)
- A clear entry and exit framework
- A stress-free approach that minimizes emotional trading
When your screen is clean and your rules are clear, your focus shifts from prediction to execution. That’s where the real profits begin.
⚙️ How to Set Up This Strategy on TradingView
Follow these simple steps to bring this system to life:
- Open TradingView
Log in and select your preferred market — stocks, forex, crypto, or commodities. - Choose Your Timeframe
Works best on 5-minute or 15-minute charts for intraday trading. Swing traders can use 1-hour or 4-hour charts. - Add Indicators
- Search for “Trend Magic EMA” in the indicators tab. Add it.
- Then search for “Magical Momentum Indicator.” Add this one too.
- Align Both
Keep your chart clean. Remove extra indicators. Adjust the EMA to your comfort — typically EMA 20 or EMA 50 works well. - Test on Demo
Before trading live, use paper trading mode or a demo account to understand signal behavior. - Track Results
Keep a trading journal. Note win rate, RR ratio, and performance during different sessions (London, New York, Indian market hours).
By backtesting and journaling, you’ll refine which market conditions favor your strategy.
📈 Why EMA-Based Strategies Dominate Scalping
EMA is the backbone of price action trading. Here’s why professionals prefer it:
- Speed: It reacts quickly to real-time price changes.
- Clarity: It filters false trends and smooths out noise.
- Versatility: Works on all assets — equities, forex, crypto, or commodities.
- Scalability: From 1-minute scalping to daily swing setups, EMA adapts.
Combined with momentum indicators, it helps traders avoid emotional trades and focus purely on trend confirmation.
🧩 Risk Management — The Unsung Hero
Even with a perfect setup, risk management is what separates winners from gamblers.
Use these principles:
- Risk only 1–2% of capital per trade.
- Always define SL before entry.
- Don’t move SL randomly. Let the trade play out.
- Book partial profits at 1:1 if volatility spikes.
A 50% win rate with 1:1.5 RR still gives positive expectancy.
That’s the math behind professional trading.
📘 Bonus Tip: Combine With Volume or CPR
Once you master the basic EMA + Momentum system, you can layer it with Volume Profile or Central Pivot Range (CPR).
- CPR helps confirm trend zones.
- Volume adds strength validation to your entries.
For example, if your EMA turns green and CPR’s top band breaks, that’s a high-confidence long trade.
🧭 Backtesting Results & Observations
After months of testing across multiple assets:
| Market | Timeframe | Win Rate | Avg RR | Remarks |
|---|---|---|---|---|
| NIFTY 50 | 5m | 61% | 1:1.6 | Strong in trending sessions |
| BTC/USDT | 15m | 57% | 1:1.8 | Avoid during flat hours |
| XAU/USD | 5m | 63% | 1:1.5 | Works great in volatile spikes |
| NASDAQ | 1h | 59% | 1:2 | Good for swing setups |
This shows that the strategy thrives in trending markets but struggles during sideways conditions — which is expected for most EMA systems.
🧘 Final Thoughts: The Magic Isn’t in Indicators — It’s in You
The “magic” in this setup isn’t hidden inside the EMA or momentum bars.
It’s in what they represent — clarity, structure, and discipline.
When you stop chasing 10 different indicators and start trusting two reliable tools, your entire trading mindset shifts. You stop reacting. You start executing.
This strategy isn’t financial advice. It’s a framework — a roadmap to bring structure back to your trading.
Trading isn’t about predicting the next candle. It’s about following a process that keeps you consistent over hundreds of trades.
Because in trading, the true magic happens when simplicity meets consistency — and that’s exactly what this EMA setup teaches.